前言
Markdown以一种轻巧简明的设计理念,赋予了Web文档新的活力,从而代替传统以Word为主导的电子文档。Markdown大量简化了HTML标签,被广大的互联网应用所使用。程序员所熟知的Github就完全基于Markdown语法,真的可以不再需要Word了。
Markdown不是HTML,目前还不能被浏览器解析,所以我们需要Markdown的解析器,把Markdown翻译成浏览器认识的HTML文档展示出来。Marked就是一个基于Nodejs的Markdown解析引擎!
目录
- markdown介绍
- marked安装
- marked命令行使用
- marked的API使用
- marked的个性化渲染
1. markdown介绍
Markdown 是一种轻量级标记语言,创始人为约翰·格鲁伯(John Gruber)。它允许人们“使用易读易写的纯文本格式编写文档,然后转换成有效的XHTML(或者HTML)文档”。这种语言吸收了很多在电子邮件中已有的纯文本标记的特性。
Markdown 的目标是实现「易读易写」。
可读性,无论如何,都是最重要的。一份使用 Markdown 格式撰写的文件应该可以直接以纯文本发布,并且看起来不会像是由许多标签或是格式指令所构成。Markdown 语法受到一些既有 text-to-HTML 格式的影响,包括 Setext、atx、Textile、reStructuredText、Grutatext 和 EtText,而最大灵感来源其实是纯文本电子邮件的格式。
Markdown的语法简洁明了、学习容易,而且功能比纯文本更强,因此有很多人用它写博客。世界上最流行的博客平台WordPress和大型CMS如joomla、drupal都能很好的支持Markdown,Github也是支持markdown的,在个性化语法上也做了不少的改进。Markdown的中文语法介绍:http://wowubuntu.com/markdown/
2款不错的markdown的在线编辑器:
如果你还没有开始用Markdown来写文档,那你一定OUT了。
2. marked安装
系统环境
- Win7 64bit
- Nodejs:v0.10.31
- Npm:1.4.23
创建项目
~ cd D:\workspace\javascript>
~ D:\workspace\javascript>mkdir nodejs-marked && cd nodejs-marked
新建项目文件package.json
~ D:\workspace\javascript\nodejs-marked>notepad package.json
{
  "name": "marked-demo",
  "version": "0.0.1",
  "private": true,
  "dependencies": {
  }
}
安装marked库,全局安装,同时在本地项目安装。
~ D:\workspace\javascript\nodejs-marked>npm install marked --save -g
C:\Users\Administrator\AppData\Roaming\npm\marked -> C:\Users\Administrator\AppData\Roaming\npm\node_modules\marked\bin\
marked
marked@0.3.3 C:\Users\Administrator\AppData\Roaming\npm\node_modules\marked
通过-save参数,package.json文件中会自动增加marked库的依赖。
~ D:\workspace\javascript\nodejs-marked>cat package.json
{
  "name": "marked-demo",
  "version": "0.0.1",
  "private": true,
  "dependencies": {
    "marked": "^0.3.3"
  }
}
通过-g参数,完成了marked库的全局安装,这时我们就可以直接在命令,使用marked的命令了。
查看命令行帮助,直接就报错误了,真是出师不利啊。
~ D:\workspace\javascript\nodejs-marked>marked -h
child_process: customFds option is deprecated, use stdio instead.
events.js:85
      throw er; // Unhandled 'error' event
            ^
Error: spawn man ENOENT
    at exports._errnoException (util.js:746:11)
    at Process.ChildProcess._handle.onexit (child_process.js:1046:32)
    at child_process.js:1137:20
    at process._tickCallback (node.js:355:11)
    at Function.Module.runMain (module.js:503:11)
    at startup (node.js:129:16)
    at node.js:814:3
定位错误,找到./node_modules/marked/bin/marked文件中help()函数,如下代码所示,这种写法不适用于Window系统,所以才出现-h报错的情况。庆幸的是,其他的功能命令参数都是正确的。
function help() {
  var spawn = require('child_process').spawn;

  var options = {
    cwd: process.cwd(),
    env: process.env,
    setsid: false,
    customFds: [0, 1, 2]
  };

  spawn('man',
    [__dirname + '/../man/marked.1'],
    options);
}
在Linux环境,我们看一下帮助命令。
~ marked -h

marked(1)                               marked.js                               marked(1)

NAME
       marked - a javascript markdown parser

SYNOPSIS
       marked  [-o  ]  [-i  <input>]  [--help]  [--tokens]  [--pedantic]  [--gfm]
       [--breaks]  [--tables]  [--sanitize]  [--smart-lists]   [--lang-prefix   <prefix>]
       [--no-etc...] [--silent] [filename]

DESCRIPTION
       marked  is  a  full-featured  javascript markdown parser, built for speed. It also
       includes multiple GFM features.

EXAMPLES
       cat in.md | marked > out.html
       echo "hello *world*" | marked
       marked -o out.html in.md --gfm
       marked --output="hello world.html" -i in.md --no-breaks

OPTIONS
       -o, --output [output]
              Specify file output. If none is specified, write to stdout.
       -i, --input [input]
              Specify file input, otherwise use last argument as input file. If no  input
              file is specified, read from stdin.
       -t, --tokens
              Output a token stream instead of html.
       --pedantic
              Conform  to  obscure  parts  of  markdown.pl as much as possible. Don't fix
              original markdown bugs.
       --gfm  Enable github flavored markdown.
       --breaks
              Enable GFM line breaks. Only works with the gfm option.
       --tables
              Enable GFM tables. Only works with the gfm option.
       --sanitize
              Sanitize output. Ignore any HTML input.
       --smart-lists
              Use smarter list behavior than the original markdown.
       --lang-prefix [prefix]
              Set the prefix for code block classes.
       --no-sanitize, -no-etc...
              The inverse of any of the marked options above.
       --silent
              Silence error output.
       -h, --help
              Display help information.

CONFIGURATION
       For configuring and running programmatically.
       Example
           require('marked')('*foo*', { gfm: true });
BUGS
       Please report any bugs to https://github.com/chjj/marked.
LICENSE
       Copyright (c) 2011-2014, Christopher Jeffrey (MIT License).
SEE ALSO
       markdown(1), node.js(1)
3. marked命令行使用
参数说明:
- -o, –output [output]: 指定输出文件,默认为当前控制台
- -i, –input [input]: 指定输入文件或最后一个参数,默认为当前控制台输入
- -t, –tokens: 输出token流代替HTML
- –pedantic: 只解析符合markdown.pl定义的,不修正markdown的错误
- –gfm: 启动Github样式的Markdown,请参考 https://help.github.com/articles/github-flavored-markdown/
- –breaks: 支持Github换行符,必须打开gfm选项
- –tables: 支持Github表格,必须打开gfm选项
- –sanitize: 原始输出,忽略HTML标签
- –smart-lists: 优化列表输出
- –lang-prefix [prefix]: 设置前置样式
- –no-etc: 选择的反正标识
- –silent: 不输出错误信息
- -h, –help: 帮助信息
下面我们就直接使用命令行来处理markdown的文件。
新建一个Markdown文件m1.md,其中包括了文字,代码,段落,列表,格式。
Marked Demo ====================== 这是一个Marked库使用的例子。 http://blog.fens.me/nodejs-markdown-marked/ > A full-featured markdown parser and compiler, written in JavaScript. Built > for speed. [][badge] ## Install ``` bash npm install marked --save ``` ## 列表测试 + 列表测试,行1 + 列表测试,行2 + 列表测试,行3 + 列表测试,行4 ## 表格测试 A | B | C --|--|-- A1 | B1 | C1 A2 | B2 | C2 A3 | B3 | C3
使用命令行生成HTML。
D:\workspace\javascript\nodejs-marked>marked -i m1.md
<h1 id="marked-demo">Marked Demo</h1>
<p>这是一个Marked库使用的例子。 <a href="http://blog.fens.me/nodejs-markdown-marked/">http://blog.fens.me/nodejs-man-marked/</a></p>
<blockquote>
<p>A full-featured markdown parser and compiler, written in JavaScript. Built
for speed.</p>
</blockquote>
<p>[<img src="https://badge.fury.io/js/marked.png" alt="NPM version">][badge]</p<
<h2 id="install">Install</h2>
<pre><code class="lang-bash">npm install marked --save
</code></pre>
<h2 id="-">列表测试</h2>
<ul>
<li>列表测试,行1</li>
<li>列表测试,行2</li>
<li>列表测试,行3</li>
<li>列表测试,行4</li>
</ul>
<h2 id="-">表格测试</h2>
<table>
<thead>
<tr>
<th>A</th>
<th>B</th>
<th>C</th>
</tr>
</thead>
<tbody>
<tr>
<td>A1</td>
<td>B1</td>
<td>C1</td>
</tr>
<tr>
<td>A2</td>
<td>B2</td>
<td>C2</td>
</tr>
<tr>
<td>A3</td>
<td>B3</td>
<td>C3</td>
</tr>
</tbody>
</table>
从代码上面看,所有的标签都被正确解析了。再把命令行的各种参数组合一下,看看是不是会有不一样的效果。
增加-o的参数,输出到指定文件中。
~ D:\workspace\javascript\nodejs-marked>marked -i m1.md -o m1_out.html

~ D:\workspace\javascript\nodejs-marked>ls m1*
m1.md  m1_out.html
增加-t的参数,以token形式输出。
~ D:\workspace\javascript\nodejs-marked>marked -t -i m1.md
[
  {
    "type": "heading",
    "depth": 1,
    "text": "Marked Demo"
  },
  {
    "type": "paragraph",
    "text": "这是一个Marked库使用的例子。"
  },
  {
    "type": "blockquote_start"
  },
  {
    "type": "paragraph",
    "text": "A full-featured markdown parser and compiler, written in JavaScript. Built\nfor speed."
  },

//省略输出
]
4. marked的API使用
接下来,我通过API来调用marked解析markdown文本。
新建一个脚本文件mark1.js
~ D:\workspace\javascript\nodejs-marked>notepad mark1.js

var marked = require('marked');
console.log(marked('I am using __markdown__.'));
运行脚本mark1.js。
~ D:\workspace\javascript\nodejs-marked>node mark1.js
<p>I am using <strong>markdown</strong>.</p>
下面再用API读取md1.md的文本,进行解析,然后输出为HTML,新建mark2.js文件。
var marked = require('marked')
    ,fs = require("fs")
    ,http = require('http');

marked.setOptions({
    renderer: new marked.Renderer(),
    gfm: true,
    tables: true,
    breaks: true,
    pedantic: false,
    sanitize: true,
    smartLists: true,
    smartypants: false
});

fs.readFile('m1.md', 'utf-8', function (err, data) {
    if (err) throw err;
    server(marked(data));
});

function server(html){
    http.createServer(function (req, res) {
        res.writeHead(200, {'Content-Type': 'text/html;charset=utf-8'});
        res.end(html);
    }).listen(1337, '127.0.0.1');
    console.log('Server running at http://127.0.0.1:1337/');
}
启动服务
~ D:\workspace\javascript\nodejs-marked>node mark2.js
Server running at http://127.0.0.1:1337/
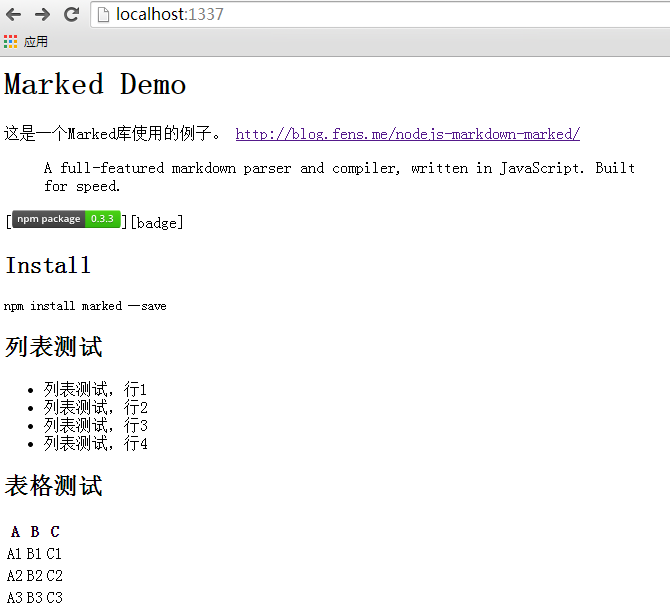
打开浏览器,http://localhost:1337/,m1.md的markdown文本被正确解析为了HTML的网页,链接,文本,段落,表格,列表都被正确显示,我们只需要自定义好样式表就行了。
5. marked的个性化渲染使用
接下来,我们引入bootstrap的样式,修饰一下页面。
修改mark2.js文件的代码。
fs.readFile('m1.md', 'utf-8', function (err, data) {

    //增加HTML的页头
    var header = '<!DOCTYPE html>'+
        '<html lang="zh-CN">'+
        '<head>'+
        '<title>Marked Demo</title>'+
        '<link rel="stylesheet" href="http://cdn.bootcss.com/bootstrap/3.3.2/css/bootstrap.min.css">'+
        '</head><body>';

    //增加HTML的页底
    var footer = '<script src="http://cdn.bootcss.com/jquery/1.11.2/jquery.min.js"></script>'+
        '<script src="http://cdn.bootcss.com/bootstrap/3.3.2/js/bootstrap.min.js"></script>'+
        '</body></html>';

    if (err) throw err;
    server(header+marked(data)+footer);
});
渲染页面后,已经好看多了。
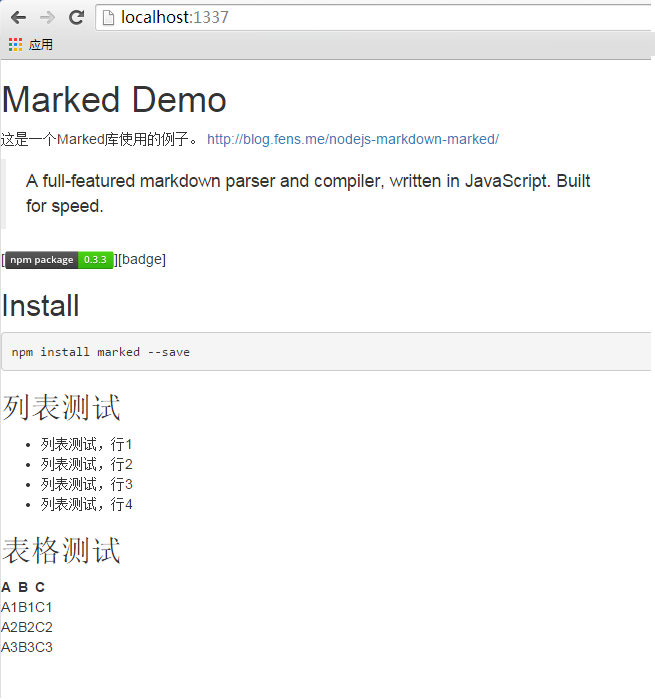
但是,美中不足的是表格table,没有样式化。检查bootstrap的表格样式,需要在table的class属性增加table table-striped的样式。
<table class="table table-striped">
  ...
</table>
我们在试用marked渲染markdown的过程是自动完成的,现在我们要增加css就需要个性化的渲染,通过API改变渲染的过程。
在代码中增加table的处理,完整的代码如下所示。
var marked = require('marked')
    , fs = require("fs")
    ,http = require('http');

marked.setOptions({
    renderer: new marked.Renderer(),
    gfm: true,
    tables: true,
    breaks: true,
    pedantic: false,
    sanitize: true,
    smartLists: true,
    smartypants: false
});

//增加的代码,用于个性化输出table
var renderer = new marked.Renderer();
renderer.table = function (header, body) {
    return '<table class="table table-striped">'+header+body+'</table>'
}

fs.readFile('m1.md', 'utf-8', function (err, data) {
    var header = '<!DOCTYPE html>'+
        '<html lang="zh-CN">'+
        '<head>'+
        '<title>Marked Demo</title>'+
        '<link rel="stylesheet" href="http://cdn.bootcss.com/bootstrap/3.3.2/css/bootstrap.min.css">'+
        '</head><body>';

    var footer = '<script src="http://cdn.bootcss.com/jquery/1.11.2/jquery.min.js"></script>'+
        '<script src="http://cdn.bootcss.com/bootstrap/3.3.2/js/bootstrap.min.js"></script>'+
        '</body></html>';

    if (err) throw err;
    var body = marked(data,{renderer: renderer});
    server(header+body+footer);
});

function server(html){
    http.createServer(function (req, res) {
        res.writeHead(200, {'Content-Type': 'text/html;charset=utf-8'});
        res.end(html);
    }).listen(1337, '127.0.0.1');
    console.log('Server running at http://127.0.0.1:1337/');
}
再次刷新网页,表格也被友好的显示了。
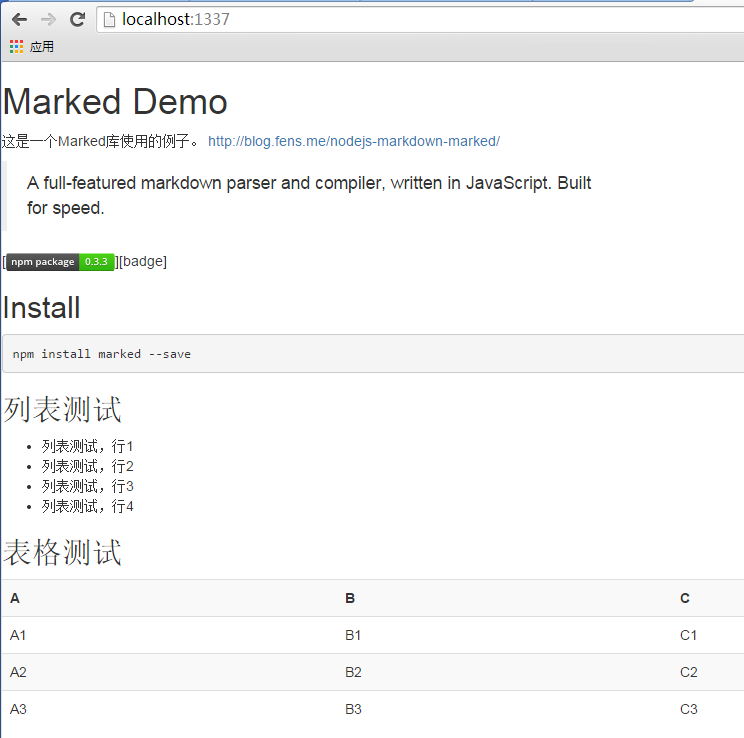
这样,我们就完成了对markdown的文档的解析,也可以个性化地设计我们需要的处理样式了。最后,就是把marked库集成到应用中就可以了,其实真的很简单。